This is the multi-page printable view of this section. Click here to print.

Return to the regular view of this page.

Export annotations and data from CVAT

List of data export formats formats supported by CVAT.

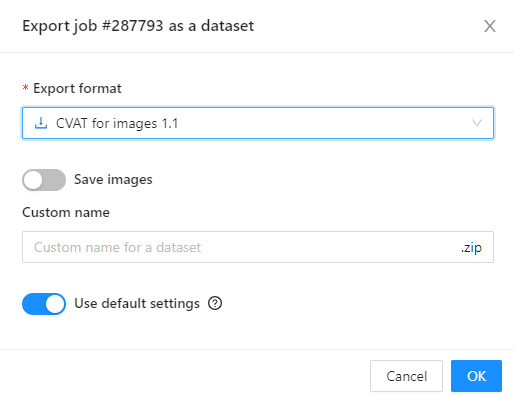
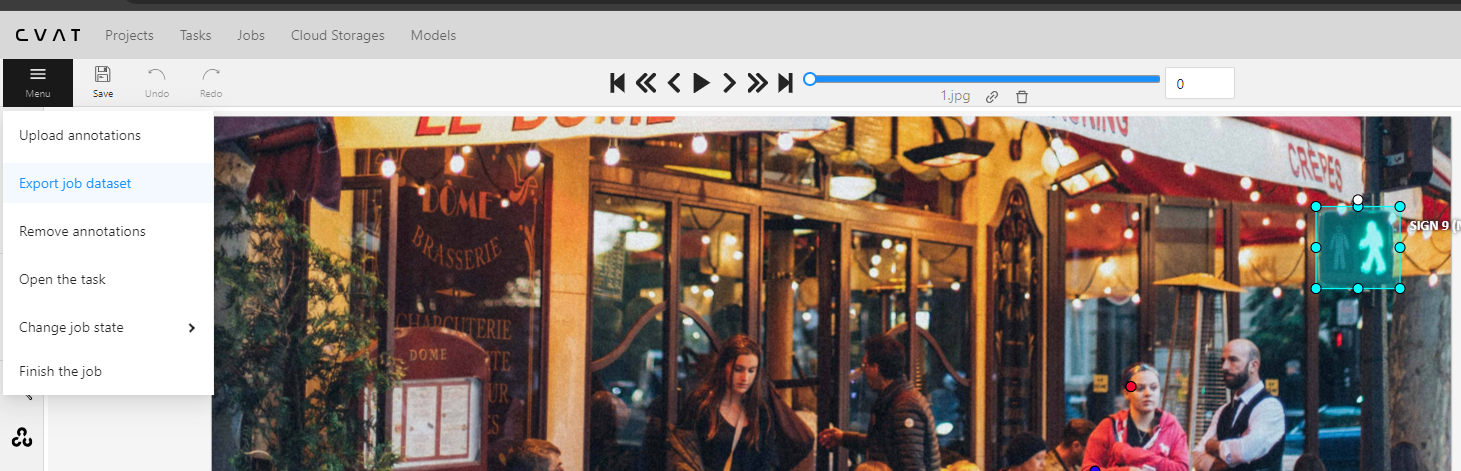
In CVAT, you have the option to export data in various formats. The choice of export format depends on the type of annotation as well as the intended future use of the dataset.

See:

Data export formats

The table below outlines the available formats for data export in CVAT.

Format Type Annotation Type Models Shapes Attributes Video Tracks
CamVid 1.0 .txt
.png
Semantic
Segmentation
U-Net, SegNet, DeepLab,
PSPNet, FCN, Mask R-CNN,
ICNet, ERFNet, HRNet,
V-Net, and others.
Polygons Not supported Not supported
Cityscapes 1.0 .txt
.png
Semantic
Segmentation
U-Net, SegNet, DeepLab,
PSPNet, FCN, ERFNet,
ICNet, Mask R-CNN, HRNet,
ENet, and others.
Polygons Specific attributes Not supported
COCO 1.0 JSON Detection, Semantic
Segmentation
YOLO (You Only Look Once),
Faster R-CNN, Mask R-CNN, SSD (Single Shot MultiBox Detector),
RetinaNet, EfficientDet, UNet,
DeepLabv3+, CenterNet, Cascade R-CNN, and others.
Bounding Boxes, Polygons Specific attributes Not supported
COCO Keypoints 1.0 .xml Keypoints OpenPose, PoseNet, AlphaPose,
SPM (Single Person Model),
Mask R-CNN with Keypoint Detection:, and others.
Skeletons Specific attributes Not supported
CVAT for images 1.1 .xml Universal format
for all types of
annotations.
Universal format
for all types of
models.
Bounding Boxes, Polygons,
Polylines, Points, Cuboids,
Skeletons, Tags.
All attributes Not supported
CVAT for video 1.1 .xml Universal format
for all types of
annotations.
Universal format
for all types of
annotations.
Bounding Boxes, Polygons,
Polylines, Points, Cuboids,
Skeletons, Tags, Tracks.
All attributes Supported
Datumaro 1.0 JSON Universal format
for all types of
annotations.
Universal format
for all types of
models.
Bounding Boxes, Polygons,
Polylines, Points, Cuboids,
Skeletons, Tags, Tracks.
All attributes Supported
ICDAR
Includes ICDAR Recognition 1.0,
ICDAR Detection 1.0,
and ICDAR Segmentation 1.0
descriptions.
.txt Text recognition,
Text detection,
Text segmentation
EAST: Efficient and Accurate
Scene Text Detector, CRNN, Mask TextSpotter, TextSnake,
and others.
Tag, Bounding Boxes, Polygons Specific attributes Not supported
ImageNet 1.0 .jpg
.txt
Semantic Segmentation,
Classification,
Detection
VGG (VGG16, VGG19), Inception, YOLO, Faster R-CNN , U-Net, and others Tags No attributes Not supported
KITTI 1.0 .txt
.png
Semantic Segmentation, Detection, 3D PointPillars, SECOND, AVOD, YOLO, DeepSORT, PWC-Net, ORB-SLAM, and others. Bounding Boxes, Polygons Specific attributes Not supported
LabelMe 3.0 .xml Compatibility,
Semantic Segmentation
U-Net, Mask R-CNN, Fast R-CNN,
Faster R-CNN, DeepLab, YOLO,
and others.
Bounding Boxes, Polygons Supported (Polygons) Not supported
LFW 1.0 .txt Verification,
Face recognition
OpenFace, VGGFace & VGGFace2,
FaceNet, ArcFace,
and others.
Tags, Skeletons Specific attributes Not supported
Market-1501 1.0 .txt Re-identification Triplet Loss Networks,
Deep ReID models, and others.
Bounding Boxes Specific attributes Not supported
MOT 1.0 .txt Video Tracking,
Detection
SORT, MOT-Net, IOU Tracker,
and others.
Bounding Boxes, Tracks Specific attributes Supported
MOTS PNG 1.0 .png
.txt
Video Tracking,
Detection
SORT, MOT-Net, IOU Tracker,
and others.
Bounding Boxes, Tracks, Masks Specific attributes Supported
Open Images 1.0 .csv Detection,
Classification,
Semantic Segmentaion
Faster R-CNN, YOLO, U-Net,
CornerNet, and others.
Bounding Boxes, Tags, Polygons Specific attributes Not supported
PASCAL VOC 1.0 .xml Classification, Detection Faster R-CNN, SSD, YOLO,
AlexNet, and others.
Bounding Boxes, Tags, Polygons Specific attributes Not supported
Segmentation Mask 1.0 .txt Semantic Segmentation Faster R-CNN, SSD, YOLO,
AlexNet, and others.
Polygons No attributes Not supported
VGGFace2 1.0 .csv Face recognition VGGFace, ResNet, Inception,
and others.
Bounding Boxes, Points No attributes Not supported
WIDER Face 1.0 .txt Detection SSD (Single Shot MultiBox Detector), Faster R-CNN, YOLO,
and others.
Bounding Boxes, Tags Specific attributes Not supported
YOLO 1.0 .txt Detection YOLOv1, YOLOv2 (YOLO9000),
YOLOv3, YOLOv4, and others.
Bounding Boxes No attributes Not supported

Exporting dataset in CVAT

Exporting dataset from Task

To export the dataset from the task, follow these steps:

  1. Open Task.

  2. Go to Actions > Export task dataset.

  3. Choose the desired format from the list of available options.

  4. (Optional) Toggle the Save images switch if you wish to include images in the export.

    Note: The Save images option is a paid feature.

    Save images option

  5. Input a name for the resulting .zip archive.

  6. Click OK to initiate the export.

Exporting dataset from Job

To export a dataset from Job follow these steps:

  1. Navigate to Menu > Export job dataset.

    Export dataset

  2. Choose the desired format from the list of available options.

  3. (Optional) Toggle the Save images switch if you wish to include images in the export.

    Note: The Save images option is a paid feature.

    Save images option

  4. Input a name for the resulting .zip archive.

  5. Click OK to initiate the export.

Data export video tutorial

For more information on the process, see the following tutorial:

1 - CVAT for image

How to export and import data in CVAT for image format

This is CVAT’s native annotation format, which fully supports all of CVAT’s annotation features. It is ideal for creating data backups.

For more information, see:

CVAT for image export

For export of images:

  • Supported annotations: Bounding Boxes, Polygons, Polylines, Points, Cuboids, Skeletons, Tags, Tracks
  • Attributes: Supported.
  • Tracks: Supported (tracks are split by frames).

The downloaded file is a zip archive with following structure:

taskname.zip/
├── images/
|   ├── img1.png
|   └── img2.jpg
└── annotations.xml

CVAT for video export

For export of images:

  • Supported annotations: Bounding Boxes, Polygons, Polylines, Points, Cuboids, Skeletons, Tags, Tracks
  • Attributes: Supported.
  • Tracks: Supported (tracks are split by frames).
  • Shapes are exported as single-frame tracks

Downloaded file is a zip archive with following structure:

taskname.zip/
├── images/
|   ├── frame_000000.png
|   └── frame_000001.png
└── annotations.xml

CVAT loader

Uploaded file: either an XML file or a .zip file containing the aforementioned structures.

2 - Datumaro

How to export and import data in Datumaro format

Datumaro serves as a versatile format capable of handling complex dataset and annotation transformations, format conversions, dataset statistics, and merging, among other features. It functions as the dataset support provider within CVAT. Essentially, anything you can do in CVAT, you can also achieve in Datumaro, but with the added benefit of specialized dataset operations.

For more information, see:

Export annotations in Datumaro format

For export of images: any 2D shapes, tags

  • Supported annotations: Bounding Boxes, Polygons.
  • Attributes: Supported.
  • Tracks: Supported.

The downloaded file is a zip archive with the following structure:

taskname.zip/
├── annotations/
│   └── default.json # fully description of classes and all dataset items
└── images/ # if the option `save images` was selected
    └── default
        ├── image1.jpg
        ├── image2.jpg
        ├── ...

Import annotations in Datumaro format

  • supported annotations: any 2D shapes, labels
  • supported attributes: any

Uploaded file: a zip archive of the following structure:

<archive_name>.zip/
└── annotations/
    ├── subset1.json # fully description of classes and all dataset items
    └── subset2.json # fully description of classes and all dataset items

JSON annotations files in the annotations directory should have similar structure:

{
  "info": {},
  "categories": {
    "label": {
      "labels": [
        {
          "name": "label_0",
          "parent": "",
          "attributes": []
        },
        {
          "name": "label_1",
          "parent": "",
          "attributes": []
        }
      ],
      "attributes": []
    }
  },
  "items": [
    {
      "id": "img1",
      "annotations": [
        {
          "id": 0,
          "type": "polygon",
          "attributes": {},
          "group": 0,
          "label_id": 1,
          "points": [1.0, 2.0, 3.0, 4.0, 5.0, 6.0, 7.0, 8.0],
          "z_order": 0
        },
        {
          "id": 1,
          "type": "bbox",
          "attributes": {},
          "group": 1,
          "label_id": 0,
          "z_order": 0,
          "bbox": [1.0, 2.0, 3.0, 4.0]
        },
        {
          "id": 2,
          "type": "mask",
          "attributes": {},
          "group": 1,
          "label_id": 0,
          "rle": {
            "counts": "d0d0:F\\0",
            "size": [10, 10]
          },
          "z_order": 0
        }
      ]
    }
  ]
}

3 - LabelMe

How to export and import data in LabelMe format

The LabelMe format is often used for image segmentation tasks in computer vision. While it may not be specifically tied to any particular models, it’s designed to be versatile and can be easily converted to formats that are compatible with popular frameworks like TensorFlow or PyTorch.

For more information, see:

LabelMe export

For export of images:

  • Supported annotations: Bounding Boxes, Polygons.
  • Attributes: Supported for Polygons.
  • Tracks: Not supported.

The downloaded file is a .zip archive with the following structure:

taskname.zip/
├── img1.jpg
└── img1.xml

LabelMe import

Uploaded file: a zip archive of the following structure:

taskname.zip/
├── Masks/
|   ├── img1_mask1.png
|   └── img1_mask2.png
├── img1.xml
├── img2.xml
└── img3.xml
  • supported annotations: Rectangles, Polygons, Masks (as polygons)

4 - MOT

How to export and import data in MOT format

The MOT (Multiple Object Tracking) sequence format is widely used for evaluating multi-object tracking algorithms, particularly in the domains of pedestrian tracking, vehicle tracking, and more. The MOT sequence format essentially contains frames of video along with annotations that specify object locations and identities over time.

For more information, see:

MOT export

For export of images and videos:

  • Supported annotations: Bounding Boxes, Tracks.
  • Attributes: visibility (number), ignored (checkbox)
  • Tracks: Supported.

The downloaded file is a .zip archive with the following structure:

taskname.zip/
├── img1/
|   ├── image1.jpg
|   └── image2.jpg
└── gt/
    ├── labels.txt
    └── gt.txt

# labels.txt
cat
dog
person
...

# gt.txt
# frame_id, track_id, x, y, w, h, "not ignored", class_id, visibility, <skipped>
1,1,1363,569,103,241,1,1,0.86014
...

MOT import

Uploaded file: a zip archive of the structure above or:

archive.zip/
└── gt/
    └── gt.txt
    └── labels.txt # optional, mandatory for non-official labels
  • supported annotations: Rectangle tracks

5 - MOTS

How to export and import data in MOTS format

The MOT (Multiple Object Tracking) sequence format is widely used for evaluating multi-object tracking algorithms, particularly in the domains of pedestrian tracking, vehicle tracking, and more. The MOT sequence format essentially contains frames of video along with annotations that specify object locations and identities over time.

This version encoded as .png. Supports masks.

For more information, see:

MOTS PNG export

For export of images and videos:

  • Supported annotations: Bounding Boxes, Tracks.
  • Attributes: visibility (number), ignored (checkbox).
  • Tracks: Supported.

The downloaded file is a .zip archive with the following structure:

taskname.zip/
└── <any_subset_name>/
    |   images/
    |   ├── image1.jpg
    |   └── image2.jpg
    └── instances/
        ├── labels.txt
        ├── image1.png
        └── image2.png

# labels.txt
cat
dog
person
...
  • supported annotations: Rectangle and Polygon tracks

MOTS PNG import

Uploaded file: a zip archive of the structure above

  • supported annotations: Polygon tracks

6 - COCO

How to export and import data in COCO format

A widely-used machine learning structure, the COCO dataset is instrumental for tasks involving object identification and image segmentation. This format is compatible with projects that employ bounding boxes or polygonal image annotations.

For more information, see:

COCO export

For export of images and videos:

  • Supported annotations: Bounding Boxes, Polygons.
  • Attributes:
    • is_crowd This can either be a checkbox or an integer (with values of 0 or 1). It indicates that the instance (or group of objects) should include an RLE-encoded mask in the segmentation field. All shapes within the group coalesce into a single, overarching mask, with the largest shape setting the properties for the entire object group.
    • score: This numerical field represents the annotation score.
    • Arbitrary attributes: These will be stored within the attributes section of the annotation.
  • Tracks: Not supported.

The downloaded file is a .zip archive with the following structure:

archive.zip/
├── images/
│   ├── train/
│   │   ├── <image_name1.ext>
│   │   ├── <image_name2.ext>
│   │   └── ...
│   └── val/
│       ├── <image_name1.ext>
│       ├── <image_name2.ext>
│       └── ...
└── annotations/
   ├── <task>_<subset_name>.json
   └── ...

When exporting a dataset from a Project, subset names will mirror those used within the project itself. Otherwise, a singular default subset will be created to house all the dataset information. The section aligns with one of the specific COCO tasks, such as instances, panoptic, image_info, labels, captions, or stuff.

COCO import

Uplod format: a single unpacked *.json or a zip archive with the structure described above or here (without images).

  • supported annotations: Polygons, Rectangles (if the segmentation field is empty)
  • supported tasks: instances, person_keypoints (only segmentations will be imported), panoptic

How to create a task from MS COCO dataset

  1. Download the MS COCO dataset.

    For example val images and instances annotations

  2. Create a CVAT task with the following labels:

    person bicycle car motorcycle airplane bus train truck boat "traffic light" "fire hydrant" "stop sign" "parking meter" bench bird cat dog horse sheep cow elephant bear zebra giraffe backpack umbrella handbag tie suitcase frisbee skis snowboard "sports ball" kite "baseball bat" "baseball glove" skateboard surfboard "tennis racket" bottle "wine glass" cup fork knife spoon bowl banana apple sandwich orange broccoli carrot "hot dog" pizza donut cake chair couch "potted plant" bed "dining table" toilet tv laptop mouse remote keyboard "cell phone" microwave oven toaster sink refrigerator book clock vase scissors "teddy bear" "hair drier" toothbrush
    
  3. Select val2017.zip as data (See Creating an annotation task guide for details)

  4. Unpack annotations_trainval2017.zip

  5. click Upload annotation button, choose COCO 1.1 and select instances_val2017.json annotation file. It can take some time.

7 - COCO Keypoints

How to export and import data in COCO Keypoints format

The COCO Keypoints format is designed specifically for human pose estimation tasks, where the objective is to identify and localize body joints (keypoints) on a human figure within an image.

This specialized format is used with a variety of state-of-the-art models focused on pose estimation.

For more information, see:

COCO Keypoints export

For export of images:

  • Supported annotations: Skeletons
  • Attributes:
    • is_crowd This can either be a checkbox or an integer (with values of 0 or 1). It indicates that the instance (or group of objects) should include an RLE-encoded mask in the segmentation field. All shapes within the group coalesce into a single, overarching mask, with the largest shape setting the properties for the entire object group.
    • score: This numerical field represents the annotation score.
    • Arbitrary attributes: These will be stored within the attributes section of the annotation.
  • Tracks: Not supported.

Downloaded file is a .zip archive with the following structure:

archive.zip/
├── images/
│
│   ├── <image_name1.ext>
│   ├── <image_name2.ext>
│   └── ...
├──<annotations>.xml

COCO import

Uploaded file: a single unpacked *.json or a zip archive with the structure described here (without images).

  • supported annotations: Skeletons

person_keypoints,

Support for COCO tasks via Datumaro is described here For example, support for COCO keypoints over Datumaro:

  1. Install Datumaro pip install datumaro
  2. Export the task in the Datumaro format, unzip
  3. Export the Datumaro project in coco / coco_person_keypoints formats datum export -f coco -p path/to/project [-- --save-images]

This way, one can export CVAT points as single keypoints or keypoint lists (without the visibility COCO flag).

8 - Pascal VOC

How to export and import data in Pascal VOC format

The Pascal VOC (Visual Object Classes) format is one of the earlier established benchmarks for object classification and detection, which provides a standardized image data set for object class recognition.

The export data format is XML-based and has been widely adopted in computer vision tasks.

For more information, see:

Pascal VOC export

For export of images:

  • Supported annotations: Bounding Boxes (detection), Tags (classification), Polygons (segmentation)
  • Attributes:
    • occluded as both UI option and a separate attribute.
    • truncated and difficult must be defined for labels as checkbox.
    • Arbitrary attributes in the attributes section of XML files.
  • Tracks: Not supported.

The downloaded file is a .zip archive with the following structure:

taskname.zip/
├── JPEGImages/
│   ├── <image_name1>.jpg
│   ├── <image_name2>.jpg
│   └── <image_nameN>.jpg
├── Annotations/
│   ├── <image_name1>.xml
│   ├── <image_name2>.xml
│   └── <image_nameN>.xml
├── ImageSets/
│   └── Main/
│       └── default.txt
└── labelmap.txt

# labelmap.txt
# label : color_rgb : 'body' parts : actions
background:::
aeroplane:::
bicycle:::
bird:::

Pascal VOC import

Supported attributes: action attributes (import only, should be defined as checkbox -es)

Uploaded file: a zip archive of the structure declared above or the following:

taskname.zip/
├── <image_name1>.xml
├── <image_name2>.xml
└── <image_nameN>.xml

It must be possible for CVAT to match the frame name and file name from annotation .xml file (the filename tag, e. g. <filename>2008_004457.jpg</filename> ).

There are 2 options:

  1. full match between frame name and file name from annotation .xml (in cases when task was created from images or image archive).

  2. match by frame number. File name should be <number>.jpg or frame_000000.jpg. It should be used when task was created from video.

How to create a task from Pascal VOC dataset

  1. Download the Pascal Voc dataset (Can be downloaded from the PASCAL VOC website)

  2. Create a CVAT task with the following labels:

    aeroplane bicycle bird boat bottle bus car cat chair cow diningtable
    dog horse motorbike person pottedplant sheep sofa train tvmonitor
    

    You can add ~checkbox=difficult:false ~checkbox=truncated:false attributes for each label if you want to use them.

    Select interesting image files (See Creating an annotation task guide for details)

  3. zip the corresponding annotation files

  4. click Upload annotation button, choose Pascal VOC ZIP 1.1

    and select the zip file with annotations from previous step. It may take some time.

9 - Segmentation Mask

How to export and import data in Segmentation Mask format

Segmentation masks format is often used in the training of models for tasks like semantic segmentation, instance segmentation, and panoptic segmentation.

Segmentation Mask in CVAT is a format created by CVAT engineers inside the Pascal VOC

Segmentation mask export

For export of images:

  • Supported annotations: Bounding Boxes, Polygons.
  • Attributes: Not supported.
  • Tracks: Not supported.

The downloaded file is a .zip archive with the following structure:

taskname.zip/
├── labelmap.txt # optional, required for non-VOC labels
├── ImageSets/
│   └── Segmentation/
│       └── default.txt # list of image names without extension
├── SegmentationClass/ # merged class masks
│   ├── image1.png
│   └── image2.png
└── SegmentationObject/ # merged instance masks
    ├── image1.png
    └── image2.png

# labelmap.txt
# label : color (RGB) : 'body' parts : actions
background:0,128,0::
aeroplane:10,10,128::
bicycle:10,128,0::
bird:0,108,128::
boat:108,0,100::
bottle:18,0,8::
bus:12,28,0::

The mask is a png image that can have either 1 or 3 channels. Each pixel in the image has a color that corresponds to a specific label. The colors are generated according to the Pascal VOC algorithm. By default, the color (0, 0, 0) is used to represent the background.

Segmentation mask import

Uploaded file: a zip archive of the following structure:

  taskname.zip/
  ├── labelmap.txt # optional, required for non-VOC labels
  ├── ImageSets/
  │   └── Segmentation/
  │       └── <any_subset_name>.txt
  ├── SegmentationClass/
  │   ├── image1.png
  │   └── image2.png
  └── SegmentationObject/
      ├── image1.png
      └── image2.png

It is also possible to import grayscale (1-channel) PNG masks. For grayscale masks provide a list of labels with the number of lines equal to the maximum color index on images. The lines must be in the right order so that line index is equal to the color index. Lines can have arbitrary, but different, colors. If there are gaps in the used color indices in the annotations, they must be filled with arbitrary dummy labels. Example:

q:0,128,0:: # color index 0
aeroplane:10,10,128:: # color index 1
_dummy2:2,2,2:: # filler for color index 2
_dummy3:3,3,3:: # filler for color index 3
boat:108,0,100:: # color index 3
...
_dummy198:198,198,198:: # filler for color index 198
_dummy199:199,199,199:: # filler for color index 199
...
the last label:12,28,0:: # color index 200
  • supported shapes: Polygons

10 - YOLO

How to export and import data in YOLO format

YOLO, which stands for “You Only Look Once,” is a renowned framework predominantly utilized for real-time object detection tasks. Its efficiency and speed make it an ideal choice for many applications. While YOLO has its unique data format, this format can be tailored to suit other object detection models as well.

For more information, see:

YOLO export

For export of images:

  • Supported annotations: Bounding Boxes.
  • Attributes: Not supported.
  • Tracks: Not supported.

The downloaded file is a .zip archive with the following structure:

archive.zip/
├── obj.data
├── obj.names
├── obj_<subset>_data
│   ├── image1.txt
│   └── image2.txt
└── train.txt # list of subset image paths

# the only valid subsets are: train, valid
# train.txt and valid.txt:
obj_<subset>_data/image1.jpg
obj_<subset>_data/image2.jpg

# obj.data:
classes = 3 # optional
names = obj.names
train = train.txt
valid = valid.txt # optional
backup = backup/ # optional

# obj.names:
cat
dog
airplane

# image_name.txt:
# label_id - id from obj.names
# cx, cy - relative coordinates of the bbox center
# rw, rh - relative size of the bbox
# label_id cx cy rw rh
1 0.3 0.8 0.1 0.3
2 0.7 0.2 0.3 0.1

Each annotation file, with the .txt extension, is named to correspond with its associated image file.

For example, frame_000001.txt serves as the annotation for the frame_000001.jpg image.

The structure of the .txt file is as follows: each line describes a label and a bounding box in the format label_id cx cy w h. The file obj.names contains an ordered list of label names.

YOLO import

Uploaded file: a zip archive of the same structure as above It must be possible to match the CVAT frame (image name) and annotation file name. There are 2 options:

  1. full match between image name and name of annotation *.txt file (in cases when a task was created from images or archive of images).

  2. match by frame number (if CVAT cannot match by name). File name should be in the following format <number>.jpg . It should be used when task was created from a video.

How to create a task from YOLO formatted dataset (from VOC for example)

  1. Follow the official guide (see Training YOLO on VOC section) and prepare the YOLO formatted annotation files.

  2. Zip train images

    zip images.zip -j -@ < train.txt
    
  3. Create a CVAT task with the following labels:

    aeroplane bicycle bird boat bottle bus car cat chair cow diningtable dog
    horse motorbike person pottedplant sheep sofa train tvmonitor
    

    Select images. zip as data. Most likely you should use share functionality because size of images. zip is more than 500Mb. See Creating an annotation task guide for details.

  4. Create obj.names with the following content:

    aeroplane
    bicycle
    bird
    boat
    bottle
    bus
    car
    cat
    chair
    cow
    diningtable
    dog
    horse
    motorbike
    person
    pottedplant
    sheep
    sofa
    train
    tvmonitor
    
  5. Zip all label files together (we need to add only label files that correspond to the train subset):

    cat train.txt | while read p; do echo ${p%/*/*}/labels/${${p##*/}%%.*}.txt; done | zip labels.zip -j -@ obj.names
    
  6. Click Upload annotation button, choose YOLO 1.1 and select the zip file with labels from the previous step.

11 - ImageNet

How to export and import data in ImageNet format

The ImageNet is typically used for a variety of computer vision tasks, including but not limited to image classification, object detection, and segmentation.

It is widely recognized and used in the training and benchmarking of various machine learning models.

For more information, see:

ImageNet export

For export of images:

  • Supported annotations: Tags.
  • Attributes: Not supported.
  • Tracks: Not supported.

The downloaded file is a .zip archive with the following structure:

# if we save images:
taskname.zip/
├── label1/
|   ├── label1_image1.jpg
|   └── label1_image2.jpg
└── label2/
    ├── label2_image1.jpg
    ├── label2_image3.jpg
    └── label2_image4.jpg

# if we keep only annotation:
taskname.zip/
├── <any_subset_name>.txt
└── synsets.txt

ImageNet import

Uploaded file: a zip archive of the structure above

  • supported annotations: Labels

12 - Wider Face

How to export and import data in Wider Face format

The WIDER Face dataset is widely used for face detection tasks. Many popular models for object detection and face detection specifically are trained on this dataset for benchmarking and deployment.

For more information, see:

WIDER Face export

For export of images:

  • Supported annotations: Bounding Boxes (with attributes), Tags.
  • Attributes:
    • blur, expression, illumination, pose, invalid
    • occluded (both the annotation property & an attribute).
  • Tracks: Not supported.

The downloaded file is a .zip archive with the following structure:

taskname.zip/
├── labels.txt # optional
├── wider_face_split/
│   └── wider_face_<any_subset_name>_bbx_gt.txt
└── WIDER_<any_subset_name>/
    └── images/
        ├── 0--label0/
        │   └── 0_label0_image1.jpg
        └── 1--label1/
            └── 1_label1_image2.jpg

WIDER Face import

Uploaded file: a zip archive of the structure above

  • supported annotations: Rectangles (with attributes), Labels
  • supported attributes:
    • blur, expression, illumination, occluded, pose, invalid

13 - CamVid

How to export and import data in CamVid format

The CamVid (Cambridge-driving Labeled Video Database) format is most commonly used in the realm of semantic segmentation tasks. It is particularly useful for training and evaluating models for autonomous driving and other vision-based robotics applications.

For more information, see:

CamVid export

For export of images and videos:

  • Supported annotations: Bounding Boxes, Polygons.
  • Attributes: Not supported.
  • Tracks: Not supported.

The downloaded file is a .zip archive with the following structure:

taskname.zip/
├── label_colors.txt # optional, required for non-CamVid labels
├── <any_subset_name>/
|   ├── image1.png
|   └── image2.png
├── <any_subset_name>annot/
|   ├── image1.png
|   └── image2.png
└── <any_subset_name>.txt

# label_colors.txt (with color value type)
# if you want to manually set the color for labels, configure label_colors.txt as follows:
# color (RGB) label
0 0 0 Void
64 128 64 Animal
192 0 128 Archway
0 128 192 Bicyclist
0 128 64 Bridge

# label_colors.txt (without color value type)
# if you do not manually set the color for labels, it will be set automatically:
# label
Void
Animal
Archway
Bicyclist
Bridge

A mask in the CamVid dataset is typically a .png image with either one or three channels.

In this image, each pixel is assigned a specific color that corresponds to a particular label.

By default, the color (0, 0, 0)—or black—is used to represent the background.

CamVid import

For import of images:

  • Uploaded file: a .zip archive of the structure above
  • supported annotations: Polygons

14 - VGGFace2

How to export and import data in VGGFace2 format

The VGGFace2 is primarily designed for face recognition tasks and is most commonly used with deep learning models specifically designed for face recognition, verification, and similar tasks.

For more information, see:

VGGFace2 export

For export of images:

  • Supported annotations: Bounding Boxes, Points (landmarks - groups of 5 points).
  • Attributes: Not supported.
  • Tracks: Not supported.

The downloaded file is a .zip archive with the following structure:

taskname.zip/
├── labels.txt # optional
├── <any_subset_name>/
|   ├── label0/
|   |   └── image1.jpg
|   └── label1/
|       └── image2.jpg
└── bb_landmark/
    ├── loose_bb_<any_subset_name>.csv
    └── loose_landmark_<any_subset_name>.csv
# labels.txt
# n000001 car
label0 <class0>
label1 <class1>

VGGFace2 import

Uploaded file: a zip archive of the structure above

  • supported annotations: Rectangles, Points (landmarks - groups of 5 points)

15 - Market-1501

How to export and import data in Market-1501 format

The Market-1501 dataset is widely used for person re-identification tasks. It is a challenging dataset that has gained significant attention in the computer vision community.

For more information, see:

Market-1501 export

For export of images:

  • Supported annotations: Bounding Boxes
  • Attributes: query (checkbox), person_id (number), camera_id(number).
  • Tracks: Not supported.

Th downloaded file is a .zip archive with the following structure:

taskname.zip/
├── bounding_box_<any_subset_name>/
│   └── image_name_1.jpg
└── query
    ├── image_name_2.jpg
    └── image_name_3.jpg
# if we keep only annotation:
taskname.zip/
└── images_<any_subset_name>.txt
# images_<any_subset_name>.txt
query/image_name_1.jpg
bounding_box_<any_subset_name>/image_name_2.jpg
bounding_box_<any_subset_name>/image_name_3.jpg
# image_name = 0001_c1s1_000015_00.jpg
0001 - person id
c1 - camera id (there are totally 6 cameras)
s1 - sequence
000015 - frame number in sequence
00 - means that this bounding box is the first one among the several

Market-1501 import

Uploaded file: a zip archive of the structure above

  • supported annotations: Label market-1501 with attributes (query, person_id, camera_id)

16 - ICDAR13/15

How to export and import data in ICDAR13/15 format

ICDAR 13/15 formats are typically used for text detection and recognition tasks and OCR (Optical Character Recognition).

These formats are usually paired with specialized text detection and recognition models.

For more information, see:

ICDAR13/15 export

For export of images:

  • ICDAR Recognition 1.0 (Text recognition):
    • Supported annotations: Tag icdar
    • Attributes: caption.
  • ICDAR Detection 1.0 (Text detection):
    • Supported annotations: Bounding Boxes, Polygons with lavel icdar added in constructor.
    • Attributes: text.
  • ICDAR Segmentation 1.0 (Text segmentation):
    • Supported annotations: Bounding Boxes, Polygons with label icdar added in constructor.
    • Attributes: index, text, color, center
  • Tracks: Not supported.

The downloaded file is a .zip archive with the following structure:

# text recognition task
taskname.zip/
└── word_recognition/
    └── <any_subset_name>/
        ├── images
        |   ├── word1.png
        |   └── word2.png
        └── gt.txt
# text localization task
taskname.zip/
└── text_localization/
    └── <any_subset_name>/
        ├── images
        |   ├── img_1.png
        |   └── img_2.png
        ├── gt_img_1.txt
        └── gt_img_1.txt
#text segmentation task
taskname.zip/
└── text_localization/
    └── <any_subset_name>/
        ├── images
        |   ├── 1.png
        |   └── 2.png
        ├── 1_GT.bmp
        ├── 1_GT.txt
        ├── 2_GT.bmp
        └── 2_GT.txt

ICDAR13/15 import

Uploaded file: a zip archive of the structure above

Word recognition task:

  • supported annotations: Label icdar with attribute caption

Text localization task:

  • supported annotations: Rectangles and Polygons with label icdar and attribute text

Text segmentation task:

  • supported annotations: Rectangles and Polygons with label icdar and attributes index, text, color, center

17 - Open Images

How to export and import data in Open Images format

The Open Images format is based on a large-scale, diverse dataset that contains object detection, object segmentation, visual relationship, and localized narratives annotations.

Its export data format is compatible with many object detection and segmentation models.

For more information, see:

Open Images export

For export of images:

  • Supported annotations: Bounding Boxes (detection), Tags (classification), Polygons (segmentation).

  • Supported attributes:

    • Tags: score must be defined for labels as text or number. The confidence level from 0 to 1.
    • Bounding boxes:
      score must be defined for labels as text or number. The confidence level from 0 to 1.
      occluded as both UI option and a separate attribute. Whether the object is occluded by another object.
      truncated must be defined for labels as checkbox. Whether the object extends beyond the boundary of the image.
      is_group_of must be defined for labels as checkbox. Whether the object represents a group of objects of the same class.
      is_depiction must be defined for labels as checkbox. Whether the object is a depiction (such as a drawing) rather than a real object.
      is_inside must be defined for labels as checkbox. Whether the object is seen from the inside.
    • Masks:
      box_id must be defined for labels as text. An identifier for the bounding box associated with the mask.
      predicted_iou must be defined for labels as text or number. Predicted IoU value with respect to the ground truth.
  • Tracks: Not supported.

The downloaded file is a .zip archive with the following structure:

└─ taskname.zip/
    ├── annotations/
    │   ├── bbox_labels_600_hierarchy.json
    │   ├── class-descriptions.csv
    |   ├── images.meta  # additional file with information about image sizes
    │   ├── <subset_name>-image_ids_and_rotation.csv
    │   ├── <subset_name>-annotations-bbox.csv
    │   ├── <subset_name>-annotations-human-imagelabels.csv
    │   └── <subset_name>-annotations-object-segmentation.csv
    ├── images/
    │   ├── subset1/
    │   │   ├── <image_name101.jpg>
    │   │   ├── <image_name102.jpg>
    │   │   └── ...
    │   ├── subset2/
    │   │   ├── <image_name201.jpg>
    │   │   ├── <image_name202.jpg>
    │   │   └── ...
    |   ├── ...
    └── masks/
        ├── subset1/
        │   ├── <mask_name101.png>
        │   ├── <mask_name102.png>
        │   └── ...
        ├── subset2/
        │   ├── <mask_name201.png>
        │   ├── <mask_name202.png>
        │   └── ...
        ├── ...

Open Images import

Uploaded file: a zip archive of the following structure:

└─ upload.zip/
    ├── annotations/
    │   ├── bbox_labels_600_hierarchy.json
    │   ├── class-descriptions.csv
    |   ├── images.meta  # optional, file with information about image sizes
    │   ├── <subset_name>-image_ids_and_rotation.csv
    │   ├── <subset_name>-annotations-bbox.csv
    │   ├── <subset_name>-annotations-human-imagelabels.csv
    │   └── <subset_name>-annotations-object-segmentation.csv
    └── masks/
        ├── subset1/
        │   ├── <mask_name101.png>
        │   ├── <mask_name102.png>
        │   └── ...
        ├── subset2/
        │   ├── <mask_name201.png>
        │   ├── <mask_name202.png>
        │   └── ...
        ├── ...

Image ids in the <subset_name>-image_ids_and_rotation.csv should match with image names in the task.

18 - Cityscapes

How to export and import data in Cityscapes format

The Cityscapes format is a widely-used standard in the field of computer vision, particularly for tasks involving semantic and instance segmentation in urban scenes. This dataset format typically comprises high-resolution images of cityscapes along with detailed pixel-level annotations.

Each pixel is labeled with a category such as “road,” “pedestrian,” or “vehicle,” making it a valuable resource for training and validating machine learning models aimed at understanding urban environments. It’s a go-to choice for researchers and professionals working on autonomous vehicles, robotics, and smart cities.

For more information, see:

Cityscapes export

For export of images:

  • Supported annotations: Polygons (segmentation), Bounding Boxes.
  • Attributes:
    • is_crowd boolean, should be defined for labels as checkbox. Specifies if the annotation label can distinguish between different instances. If False, the annotation id field encodes the instance id.
  • Tracks: Not supported.

The downloaded file is a .zip archive with the following structure:

.
├── label_color.txt
├── gtFine
│   ├── <subset_name>
│   │   └── <city_name>
│   │       ├── image_0_gtFine_instanceIds.png
│   │       ├── image_0_gtFine_color.png
│   │       ├── image_0_gtFine_labelIds.png
│   │       ├── image_1_gtFine_instanceIds.png
│   │       ├── image_1_gtFine_color.png
│   │       ├── image_1_gtFine_labelIds.png
│   │       ├── ...
└── imgsFine  # if saving images was requested
    └── leftImg8bit
        ├── <subset_name>
        │   └── <city_name>
        │       ├── image_0_leftImg8bit.png
        │       ├── image_1_leftImg8bit.png
        │       ├── ...
  • label_color.txt a file that describes the color for each label
# label_color.txt example
# r g b label_name
0 0 0 background
0 255 0 tree
...
  • *_gtFine_color.png class labels encoded by its color.
  • *_gtFine_labelIds.png class labels are encoded by its index.
  • *_gtFine_instanceIds.png class and instance labels encoded by an instance ID. The pixel values encode class and the individual instance: the integer part of a division by 1000 of each ID provides class ID, the remainder is the instance ID. If a certain annotation describes multiple instances, then the pixels have the regular ID of that class

Cityscapes annotations import

Uploaded file: a zip archive with the following structure:

.
├── label_color.txt # optional
└── gtFine
    └── <city_name>
        ├── image_0_gtFine_instanceIds.png
        ├── image_1_gtFine_instanceIds.png
        ├── ...

Creating task with Cityscapes dataset

Create a task with the labels you need or you can use the labels and colors of the original dataset. To work with the Cityscapes format, you must have a black color label for the background.

Original Cityscapes color map:

[
    {"name": "unlabeled", "color": "#000000", "attributes": []},
    {"name": "egovehicle", "color": "#000000", "attributes": []},
    {"name": "rectificationborder", "color": "#000000", "attributes": []},
    {"name": "outofroi", "color": "#000000", "attributes": []},
    {"name": "static", "color": "#000000", "attributes": []},
    {"name": "dynamic", "color": "#6f4a00", "attributes": []},
    {"name": "ground", "color": "#510051", "attributes": []},
    {"name": "road", "color": "#804080", "attributes": []},
    {"name": "sidewalk", "color": "#f423e8", "attributes": []},
    {"name": "parking", "color": "#faaaa0", "attributes": []},
    {"name": "railtrack", "color": "#e6968c", "attributes": []},
    {"name": "building", "color": "#464646", "attributes": []},
    {"name": "wall", "color": "#66669c", "attributes": []},
    {"name": "fence", "color": "#be9999", "attributes": []},
    {"name": "guardrail", "color": "#b4a5b4", "attributes": []},
    {"name": "bridge", "color": "#966464", "attributes": []},
    {"name": "tunnel", "color": "#96785a", "attributes": []},
    {"name": "pole", "color": "#999999", "attributes": []},
    {"name": "polegroup", "color": "#999999", "attributes": []},
    {"name": "trafficlight", "color": "#faaa1e", "attributes": []},
    {"name": "trafficsign", "color": "#dcdc00", "attributes": []},
    {"name": "vegetation", "color": "#6b8e23", "attributes": []},
    {"name": "terrain", "color": "#98fb98", "attributes": []},
    {"name": "sky", "color": "#4682b4", "attributes": []},
    {"name": "person", "color": "#dc143c", "attributes": []},
    {"name": "rider", "color": "#ff0000", "attributes": []},
    {"name": "car", "color": "#00008e", "attributes": []},
    {"name": "truck", "color": "#000046", "attributes": []},
    {"name": "bus", "color": "#003c64", "attributes": []},
    {"name": "caravan", "color": "#00005a", "attributes": []},
    {"name": "trailer", "color": "#00006e", "attributes": []},
    {"name": "train", "color": "#005064", "attributes": []},
    {"name": "motorcycle", "color": "#0000e6", "attributes": []},
    {"name": "bicycle", "color": "#770b20", "attributes": []},
    {"name": "licenseplate", "color": "#00000e", "attributes": []}
]

Upload images when creating a task:

images.zip/
    ├── image_0.jpg
    ├── image_1.jpg
    ├── ...

After creating the task, upload the Cityscapes annotations as described in the previous section.

19 - KITTI

How to export and import data in KITTI format

The KITTI format is widely used for a range of computer vision tasks related to autonomous driving, including but not limited to 3D object detection, multi-object tracking, and scene flow estimation. Given its special focus on automotive scenes, the KITTI format is generally used with models that are designed or adapted for these types of tasks.

For more information, see:

KITTI annotations export

For export of images:

  • Supported annotations: Bounding Boxes (detection), Polygons (segmentation).
  • Supported attributes:
    • occluded (Available both as a UI option and a separate attribute) Denotes that a major portion of the object within the bounding box is obstructed by another object.
    • truncated (Only applicable to bounding boxes) Must be represented as checkboxes for labels. Suggests that the bounding box does not encompass the entire object; some part is cut off.
    • is_crowd (Only valid for polygons). Should be indicated using checkboxes for labels. Signifies that the annotation encapsulates multiple instances of the same object class.
  • Tracks: Not supported.

The downloaded file is a .zip archive with the following structure:

└─ annotations.zip/
    ├── label_colors.txt # list of pairs r g b label_name
    ├── labels.txt # list of labels
    └── default/
        ├── label_2/ # left color camera label files
        │   ├── <image_name_1>.txt
        │   ├── <image_name_2>.txt
        │   └── ...
        ├── instance/ # instance segmentation masks
        │   ├── <image_name_1>.png
        │   ├── <image_name_2>.png
        │   └── ...
        ├── semantic/ # semantic segmentation masks (labels are encoded by its id)
        │   ├── <image_name_1>.png
        │   ├── <image_name_2>.png
        │   └── ...
        └── semantic_rgb/ # semantic segmentation masks (labels are encoded by its color)
            ├── <image_name_1>.png
            ├── <image_name_2>.png
            └── ...

KITTI annotations import

You can upload KITTI annotations in two ways: rectangles for the detection task and masks for the segmentation task.

For detection tasks the uploading archive should have the following structure:

└─ annotations.zip/
    ├── labels.txt # optional, labels list for non-original detection labels
    └── <subset_name>/
        ├── label_2/ # left color camera label files
        │   ├── <image_name_1>.txt
        │   ├── <image_name_2>.txt
        │   └── ...

For segmentation tasks the uploading archive should have the following structure:

└─ annotations.zip/
    ├── label_colors.txt # optional, color map for non-original segmentation labels
    └── <subset_name>/
        ├── instance/ # instance segmentation masks
        │   ├── <image_name_1>.png
        │   ├── <image_name_2>.png
        │   └── ...
        ├── semantic/ # optional, semantic segmentation masks (labels are encoded by its id)
        │   ├── <image_name_1>.png
        │   ├── <image_name_2>.png
        │   └── ...
        └── semantic_rgb/ # optional, semantic segmentation masks (labels are encoded by its color)
            ├── <image_name_1>.png
            ├── <image_name_2>.png
            └── ...

All annotation files and masks should have structures that are described in the original format specification.

20 - LFW

How to export and import data in LFW format

The Labeled Faces in the Wild (LFW) format is primarily used for face verification and face recognition tasks. The LFW format is designed to be straightforward and is compatible with a variety of machine learning and deep learning frameworks.

For more information, see:

Export LFW annotation

For export of images:

  • Supported annotations: Tags, Skeletons.

  • Attributes:

    • negative_pairs (should be defined for labels as text): list of image names with mismatched persons.
    • positive_pairs (should be defined for labels as text): list of image names with matched persons.
  • Tracks: Not supported.

The downloaded file is a .zip archive with the following structure:

<archive_name>.zip/
    └── images/ # if the option save images was selected
    │    ├── name1/
    │    │   ├── name1_0001.jpg
    │    │   ├── name1_0002.jpg
    │    │   ├── ...
    │    ├── name2/
    │    │   ├── name2_0001.jpg
    │    │   ├── name2_0002.jpg
    │    │   ├── ...
    │    ├── ...
    ├── landmarks.txt
    ├── pairs.txt
    └── people.txt

Import LFW annotation

The uploaded annotations file should be a zip file with the following structure:

<archive_name>.zip/
    └── annotations/
        ├── landmarks.txt # list with landmark points for each image
        ├── pairs.txt # list of matched and mismatched pairs of person
        └── people.txt # optional file with a list of persons name

Full information about the content of annotation files is available here

Example: create task with images and upload LFW annotations into it

This is one of the possible ways to create a task and add LFW annotations for it.

  • On the task creation page:
    • Add labels that correspond to the names of the persons.
    • For each label define text attributes with names positive_pairs and negative_pairs
    • Add images using zip archive from local repository:
images.zip/
    ├── name1_0001.jpg
    ├── name1_0002.jpg
    ├── ...
    ├── name1_<N>.jpg
    ├── name2_0001.jpg
    ├── ...
  • On the annotation page: Upload annotation -> LFW 1.0 -> choose archive with structure that described in the import section.